Thursday, October 6, 2011

It Actually IS Easy Being Green (and cheaper, too)

Since starting this blog I've meant to write about easy ways to go green, but I kind of got side-tracked by cloth-diapering. In my defense, I am a fluff addict, so I have diapers on the brain quite a bit.

Anyway, I've compiled a list of simple things that you can change in your life that will not only make you 'greener,' but will also save money (and many will make you healthier as well). Of course there are the usual green tips - turn off the lights when you're not in the room, don't have the TV, stereo, computer etc. all going at once if you're only using one of them, turn the tap off while you're brushing your teeth, but everybody knows about that stuff and does all that regularly (or at least I hope you do!). This is a list of things you may or may not have considered...


1. Wash everything you can in cold water.
About 90% of the energy used to do laundry goes to heating the water, so if you switch to washing with cold water you will save a significant amount of both electricity and money. While hot water does improve the stain-removing qualities of detergent, it's not really necessary (unless you're washing cloth diapers - hot water is required to kill any bacteria/microorganisms present). If you're worried about stains, just pre-treat with something like OxyClean, something you usually have to do even if you regularly wash with hot water. Smells come out just fine on cold. Also, there are many detergents on the market that are 'specially formulated' to work in cold water (usually they have more or special enzymes or surfactants that are designed to work better at lower temperatures), but even regular detergents will work fine on cold. You can dissolve powdered detergent in a cup of warm water before putting it into the machine.


2. Use dryer balls instead of fabric softener.
Fabric softener is one of the most USELESS products you can buy. You don't need it. At all. Most people don't even know how it actually softens your laundry - it coats it with animal fat, generally horse fat. Disgusting, I know. Not only is fabric softener a waste of money, it also attracts dirt so it makes your clothes get dirty faster. And it makes fabrics repel water, so using it on your towels is just ridiculous. Let's not even get into all the extra chemicals you're exposing yourself to (like, for example, the artificial scents in everything from fabric softener, detergent, scent sprays, which are toxic and carcinogenic).

All you need to soften your laundry are a few dryer balls.
Nellie's PVC-free Dryer Balls

Nellie's makes some nice ones - they're PVC free and they have a slot for a naturally scented fragrance stick, but I prefer the ones made of wool. Wool dryer balls can be bought in a number of eco-friendly type boutiques, or you can make your own.

Some felted wool dryer balls that I made.
Dryer balls do a number of things - soften your laundry by bouncing around in the dryer, they reduce static, and they also reduce drying time because they separate your clothes/towels/whatever while they're drying and increase the air circulation around them.

If you want to add something to your wash cycle, use vinegar - 1/4 cup in the fabric softener slot (or in a Downy ball) will do the same thing as fabric softener, plus it helps remove unwanted smells from your clothes (instead of covering them up like fabric softner).


3. Put up a clothesline.
My work costume drying in a very historically accurate way.

Drying clothes outside is a great money saver. If it takes a lot of electricity to heat water for the wash, imagine how much it takes to heat the dryer for an hour (or longer). Of course, Canadian weather (especially winter) puts a damper on how often you can dry your clothes outside, but every little bit helps. Plus it has added benefits - the sun and wind are great at taking any unwanted smells out of your laundry that the vinegar didn't get, and your clothes will dry nice and wrinkle free - no ironing required!


4. Eat REAL food.
By this I mean buy the raw ingredients and prepare your own food (this goes for baby food, too). Not only is this cheaper than buying pre-made packaged food (for every $10 you spend on pre-made packaged food, approximately $9 is for the packaging), it's much much healthier. When you make your own food, you control what goes into it. Sure, you have to deal with whatever was in the soil or feed that your food grew in/ate, but if you choose organic you can cut down on the hormones and pesticides that non-organic food is slathered in. Not to mention the harmful preservatives that are put in everything to increase shelf life and make the food look 'prettier.' And the various rat and insect parts that unavoidably become part of factory-made food.
It also helps if you buy your food from the farmer's market. If you buy local food then you're doing a bunch good things - you're helping to support local farmers and your community, you're buying food that's actually RIPE when picked (and tastes so much better!), and you're not contributing to the pollution caused by shipping food across countries.


5. Make your own jam, pickles etc.

If you're already preparing your own food, it's not too much of a leap to preserve it, too. This has all the benefits listed above, plus it's fun! Even food bought at a farmer's market (which on the surface may seem more expensive than buying at a grocery store) will be cheaper in the end if you use it to make your own jams, preserves, pickles etc. instead of buying these ready made.


6. Clean your home with vinegar and baking soda.
I'm sure everyone has heard that indoor air pollution is often worse than outdoor air pollution. It's a sad fact. We spend a lot of time indoors these days, usually with the windows closed. The way to freshen the air is NOT with smelly sprays but by reducing the amount of harmful chemicals we're exposed to. An easy way to do this is cut out commercial cleaning products (and their toxic ingredients) which are responsible for a good portion of the indoor pollution.
You wanna wash the floor? Pour some vinegar in a bucket of hot water and mop away, although technically you don't even need the vinegar, hot water will wash just fine. The toilets? Sprinkle some baking soda on the sides and then pour in some vinegar. The bathtub? Same as for toilets, and then scrub away. Vinegar also does a stellar job at removing lime scaling.


7. Use cloth instead of paper.
This really should be a no-brainer, especially for paper towels - why spend money on something you're just gonna throw away after using? Why can't we use towels to mop up spills or wash our dishes if we use them to dry our hands? I have a stack of wash clothes that started out life as bath towels. When these towels became worn out, my mom cut out the best parts, serged the edges, and voila! a free source of almost infinitely reusable mopper-uppers and cleaner-uppers. I swiped these clothes when I moved out and they're still going strong, even though they're probably close to 20 years old.
Wash cloths can also be used as tissues. It's not really any grosser than using a paper tissue - after all, washing the cloth will sanitize it (wash on hot if you're really worried, and then you've nothing at all to worry about). And if you want lotion in your tissue, just put lotion on the cloth; simple.
I haven't used paper napkins in years because they're just as much of a waste as paper tissues, if not more. Instead I use dish towels that I cut in half and then hemmed on the cut side. They work a lot better than paper napkins because you don't have to use a million of them if you're eating something messy like chicken wings, and, of course, they can be washed and reused.
Make-up pads and facial pads can also be made of cloth. You can buy some ready made, or you can just use wash cloths.
And don't even get me started on diapers. The average cost of using disposables from birth to potty training is a whopping $2500 FOR EACH CHILD, and that's not even counting disposable wipes and training pants. The average cost of using cloth diapers? $900, and that's INCLUDING the cost to wash them. Plus that's for mid-range cloth diapers - you could easily spend only a third of that, and you'd still be able to use the diapers on multiple children. And don't talk to me about poop grossing you out. No matter what you use, you're gonna get puked, peed and pooped on, that's all part of being a parent. Anyway, you're supposed to dump the poop in the toilet first even if you're using disposables (read the package, it's on every one). And you know all those gross up-the-back explosions that happen with disposables? Yeah, they don't happen in cloth.


So those are some simple green choices, but let's up the ante....


8. Grow your food.
My garden, June 2011.
You don't need a big backyard for this (though it certainly helps). You can grow tomatoes on a balcony, or hanging tomatoes (or strawberries) inside an apartment. Herbs can be grown anywhere. Potatoes can be grown in a bag or barrel. The possibilities are endless. And by growing your own food you control everything, most importantly what goes into the soil (and therefore what eventually makes it into the food you grow) so it's important that you don't use pesticides or herbicides, even on your lawn, because it WILL go into the soil and then find it's way into the food in your garden.


9. Make your own laundry detergent.

From 29 diapers

Natural laundry detergents (i.e. ones that aren't petroleum based) are much safer (and cheaper) to use. Petroleum based cleaners (Tide, Gain etc.) are chock full of toxic chemicals that can cause a myriad of problems. You can buy natural laundry detergent (vegetable based) like Nellie's or Laundry Tarts, but making your own is easy, too. There are a number of different recipes, but basically they contain washing soda, borax or oxyclean, and some kind of soap.

Here's one recipe that I want to try (you would use about 1 tbsp per regular sized load):
2 cups grated Dr. Bronner's castile soap bar (1 bar)
1 cup washing soda
1 cup borax   (from 29 Diapers)
Homemade detergent like this costs about $4 per batch, with one batch lasting about a month.

You can also use soap nuts - these are dried seeded berries from an Asian tree, and they are a truly natural way to wash.

You can use them in your laundry, as shampoo, as soap, to wash your dishes... anything you would use conventional soap for.


10. Do your laundry by hand.
Yes, this is more work but it saves a tonne of money. There are a number of ways you can do this. Some people put their laundry in the bathtub and stomp on it like they're making wine. Alternately, you can make yourself a camp-style washer bucket which will make the whole process a lot easier, and run you maybe $20.


Or, you can buy a hand powered washing machine for about triple that price.
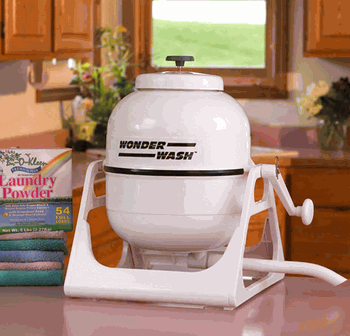
Wonder Wash hand crank washer

A lot of people choose to wash even their cloth diapers by hand, and they do actually get really clean, and it doesn't all that much effort - only about 5-10 minutes of agitation (you can leave your laundry to soak for 30 or so minutes prior to or between agitations).


11. Use a menstual cup and/or 'mama pads.'
If you thought disposable diapers were a waste of money, imagine how much money a woman throws in the garbage by using disposable menstrual pads and tampons for 35 or so years!

A Diva Cup can save you a lot of money, and it's so easy to use.


It's a silicone cup that you put in kind of like a tampon and you empty it out periodically. What's great about the cup is that it is reusable, washable, non-reactive (it's made of medical grade silicone) and you don't have to worry about getting Toxic Shock Syndrome if you leave it in for too long (unlike tampons).

If you're like me you need to use pads as back-up (in case of leaks), and cloth menstrual pads are a cheaper alternative to disposable ones.
Aren't they cute? These are from Talulah Bean
Monthly pads from Green Line Diapers - must have!

If you shudder at the thought of washing blood-soaked pads, get over it. What do you do if you leak onto your clothes, do you throw them out? No, I didn't think so.


12. Use cloth instead of toilet paper.
This one will be a really tough sell for a lot of people, but if you cloth diaper your child (and use cloth wipes on them) then this isn't too much of a stretch. Not only will this save you money, it will save millions of trees, if you care about that kind of thing. I've only been using cloth wipes instead of toilet paper for a few months (and I still use paper for the messiest stuff) but I tell you I much prefer it - cloth works so much better than paper. I also have a diaper sprayer (which is really just a re-branded hand-held bidet) so I use that first and then a cloth. I keep a wet bag in the bathroom to toss the used cloths in, and then wash them with the diaper laundry. No, it doesn't smell. No, it isn't gross. Grow up, people.

So that's it, my list of some basic greener choices. If you're wondering, I do 9 or 10 of the things on this list.

Wednesday, September 21, 2011

The Ultimate No-Sew T-shirt Diaper

I have found the ultimate no-sew t-shirt diaper, and it is also the ultimate night-time diaper! Unfortunately I can't take credit for it, but I thought I'd blog about it anyway since I love it so much. It's just a folding technique that allows you to use a t-shirt (unmodified) as a diaper, where the sleeves become the wings.


It's brilliant. After watching this I grabbed all of my no-sew t-shirt diapers and sewed all the sleeves back on.

Yes, I am a big nerd, I'm well aware of that fact.

Anyway, this is all I use on my daughter for overnights. I have four of them that I use in rotation - I love the bright colours! They just happen to match the IKEA blanket I got for my daughter:


I put a hemp doubler in it (one of my cut-down Thirsties hemp prefolds) and a Woollybottoms wool soaker on top, and that's it. For awhile I had another doubler in there - a folded up half-flannel blanket on the outside of the diaper, but it was rarely very wet in the morning so I decided to take the chance and leave it out one night, and it's been out ever since.

I use a couple of T-shirts for daytime use as well (the two smallest, a mens M and a L; the overnights are pretty much all XL) under a wool soaker, though my SWWs work well over them, too. If I were on a really tight diaper budget this is all I'd use. Honestly, the fit is spectacular, they're so versatile because you can fold them wider or narrower or longer or shorter depending on your baby's body type, and they're really really absorbent! And at $1 per diaper (no modification required!!) it's a steal.

Too bad those 2 Thirsties hemp prefolds I bought for overnights were a COMPLETE WASTE OF MONEY. Ah well, it was only $14... plus shipping... Let's not think about how many t-shirt diapers I could have gotten for that...

Monday, August 29, 2011

Frugal Fluff

I think it's really ironic that out of all the cloth diapers I've tried these past 16 or so months the ones I prefer to use are the most inexpensive, and also didn't start out life as diapers. I'm talking, of course, about my no-sew T-shirt diapers. Second to that are my cotton flannel receiving blankets that I got as hand-me-downs from various sources, and they make the BEST flats - nice and big, very absorbent, and they wash up great.

And my NEW favourite ultra-cheap alternative to actual diapers are - flour sack towels. I bought a 5-pack of them at WalMart last week and I can't stop singing their praises.


A bit of history - rewind a century or so to when families used to buy their flour in cotton sacks. When they finished all the flour they either re-used the bag to get more flour (if they were getting it straight from the mill) or, more commonly, they re-purposed the bag into towels (and probably cloth diapers, too). Why? Well most people at the time didn't have a lot of money so they had to reuse and recycle everything they had. 

Modern flour sack towels don't come from actual flour sacks, of course, but it's the same type of cotton and the same weave as the old ones (although I suspect that historic flour sacks were a tad thicker). They make good kitchen towels because they're extra absorbent, and they dry fast because they're quite thin. These two qualities make them good as cloth diapers as well! Plus they're super cheap - the ones I got were 5 for $7, and while I usually have to use two folded together for my supersoaker toddler that's still either on par or cheaper than many actual flat diapers that are sold today. I did use just one stuffed into a pocket diaper and it performed much better than I expected (no leaks even though it was pretty well saturated), so they can also make inexpensive and absorbent (and natural!) inserts. 

I had wanted to try flour sack towels as diapers for quite a long while but could never find any. I had read a few forums saying that people purchased them at Walmart, but I'm pretty sure those were all American (since they talked about Target and Meijers, which we don't have in Canada... yet - I hear Zellers was bought out by Target), and I could never find any at the Walmart closest to my house.

Recently, however, I joined a Canadian cloth diaper chat group on Facebook and a few of the ladies were talking about flour sack towels, and said they'd just gotten some at Walmart (and one of them said the towels were marked New! so that would explain why I'd never seen them before). I went the next day and was able to pick up a pack no problem.

I washed them 3 times (I'd had a few loads of laundry to do anyway) and tested them out using my favourite fold, Diaperbag. Right away I suspected that one towel wouldn't be enough for my daughter, who pees Niagara Falls every time, but I decided to try it alone the first time. I put a bummis Super Lite cover on and waited. Almost right away my daughter had a poop and even though I'd had a fleece liner on it the poop soaked through to the diaper, so after that load was washed I got to see how well stains came out of the towels (very well, it was completely gone). She'd only had a teeny pee so I put another one on her but decided to play it safe and put a sherpa doubler in with it, and then put on a trusty bummis Super Whisper Wrap. This time she had a big pee and it was almost too much for the lone towel, even with the doubler. The middle was soaked and it was even wet all the way up the back to her waist (which I've never experienced with a flannel flat unless it was completely saturated), and the wrap was soaked on the inside (no leaks, thank you bummis!). This told me two things. One - the towel transfers wetness very quickly (which is a good thing) and two, I needed to double up next time.

I was skeptical about folding two together since I'd never been able to do that with either flannel or birdseye flats (always too bulky) but I was pleasantly surprised. The doubled flat was similar in bulkiness to a prefold but much much softer. And much more absorbent - I had her in a wool soaker this time and again no leaks, even though the diaper was pretty darn heavy.

My next experiment was pad folding a towel and putting it in one of my new OS Done With Disposables pocket diapers. Yeah, I hate stuffing, but I decided to try a couple of these because they were a) cheap ($8.99 regularly but I got them for $8/each during a flash facebook sale) and b) local (they're China-made, but the WAHM who sells them lives in Milton and I get free home delivery) and c) just so darn cute! Great patterns and minky ones, too, which is new for me.

Anyway, I've been using a pad-folded Kushies flannel flat as an insert (they're just too small now to be Snappi'd on, even with my daughter's teeny bum) and did the same thing with the flour sack towel. I was able to get more layers since the towels are bigger than the Kushies flats, but it was still much much thinner. It did a great job, better than I'd expected actually, but it was so thin that I wasn't able to get the waist tight enough (darn those snaps!) and the insert sagged a lot. No leaks (the DWDs fit uncommonly well) and the towel was pretty saturated, but I'll stick with the Kushies as inserts since they make the cover fit better, and use the towels as snappi'd flats.

The floursack towels combine my favourite attributes of the t-shirts and flannel blankets - they're stretchy like the T-shirts so I can get a really nice fit around the legs (and therefore use wool soakers, which is always my preference) but they're very trim like the blankets and even softer, so even when doubled they smush nicely between my daughter's chubby legs and make it easier for her to walk (and lie on her side). They also take a Snappi better than either the t-shirts or blankets, and they're bigger than standard flats (28x29 unwashed and they don't shrink much).

And to please the historian (and Victorian Age historical interpreter) in me they look like old-fashioned diapers, more so than birdseye flats. They're super white and something about that and the tight, even weave make them look all Ol' Timey. I can easily imagine them being pinned onto a baby or washed in lye soap and then hanged on a line in the Victorian Era.
It would look more historic with pins, but pins just don't work for me.


I also have to admit that as much as I love the flour sack towels in white, I'd really love to tie-dye them after seeing a tie-dyed flat on Facebook that someone had had done.

Anyway, if I had to do it all over again with what I know now, I'd have used the flour sack towels right from the beginning. They're perfect for newborns since they're so soft (even after drying on the clothesline) and you can fold them up nice and small. I'm pretty sure one towel would suffice for the first 3 or 4 months at least, and 2 towels feel about as bulky (or not bulky) as a prefold, but again, much softer. Definitely softer than birdseye flats! I tried those for awhile but hated them. They were way to stiff to double up, and a single birdseye flat wasn't as absorbent as a flannel blanket and didn't fit as well, either.

Friday, August 19, 2011

T-shirt Diaper Love


I turned the rest of my second-hand T-shirts into No-Sew Diapers and I LOVE them. As crazy as it sounds, they are my favourite diapers right now. The jersey is surprisingly absorbent, and I like that they're stretchy, which means I can get a good fit around my daughter's skinny waist and her chubby thighs.


The diaper is surprisingly trim despite all the layers. And because I can get such a good fit around her legs (and the Snappi holds on really well) I can use the pull-on style wool soakers with these diapers, which is a big plus. But really, it fits well under any kind of cover.

My favourite part I think is the rainbow of colours I can get!

There's green:


Royal blue:

Orange:


This one's a kind of turquoise-y blue, though you can't really see it in the picture:

And of course, basic white:


Oh, and I'd like to amend my earlier comments about the right sized T-shirt - a mens L or XL is NOT too big, in fact I like how it fits much better than the medium.  A large or extra-large is much nicer to fold and it doesn't get too thick between the legs like I thought it would.

Even the XXL was all right:

It's really big, as you can see. I had to zig-zag around the collar because that extra strip of fabric that is usually in T-shirts along the shoulders and collar seams was different in this shirt - it was only along the back of the collar, and it was there in lieu of an actual serged seam. I cut around the front of the collar to remove it, then zigzagged the open seam. Anyway, this particular T-shirt isn't overly thick (about average, I guess) but even with the extra layers it still folded up well and fit nicely.


I believe it would work quite well as an overnight diaper (with the addition of a couple of doublers) which makes me regret my recent purchase of 2 Thirsties hemp jersey prefolds that I'd bought specifically for overnight, and that I unravelled before washing to make flats and almost ruined. The new fabric was so fragile that when I took all the stitching out it created a milling pinholes of various sizes that I had to stitch up by hand to keep the whole damn thing from unravelling. I should have washed them first, but I wasn't thinking.

Anyway, I love love LOVE these T-shirt diapers. Goodwill is having a 50%-off sale today and I almost went to pick up some more T-shirts... but I didn't find out until 2 in the afternoon and I didn't feel like fighting the crowd that I know would be there... plus I don't really need any more diapers right now, even one-dollar diapers. Though I'd really like to completely replace my flats with the T-shirt flats.

I wonder when they'll have another sale...

Sunday, August 14, 2011

The No-Sew T-shirt Diaper

Awhile back I read a few articles/blog posts about creating an ultra-cheap diaper stash from things you got at the second-hand store. These articles inspired me to start making my own diapers out of second-hand T-shirts, and if you've been following my blog you'd know that I've made 5 fitted diapers from various colours of T-shirts. While I do like the diapers there are a few things about the process that's recently discouraged me from making more (see 'Diaper Discouraged').

One of the discouraging factors is that I'm a flat and prefold girl. I have yet to find a fitted diaper that fits my daughter the way I want it to, and I much prefer the modularity (if you will) of prefold and especially flat diapers. Since I still had a number of untouched used T-shirts left, I decided to try my hand at making some flat diapers out of them.

I pulled out all the T-shirts and I realised one thing off the bat - I didn't want to make anything that was only one layer of jersey. I have one T-shirt that's a men's XXL that measures about 24" x 29" (!!) that would be a good candidate for two flats, but after working with jersey for a few weeks now I've come to realise that even the thickest jersey is troublesome in only one layer. If you overlock or even just zigzag the edges the needle has the tendency to chew up the fabric (even though I'm using a ball-point needle), making it weaker.

All right, I said to myself, it will have to be 2 layers. I did some more measuring and calculating and decided that any 2-layer 'flat' jersey diaper would have to be at least 15" wide - that's a comfortable width for pinning/Snappi-ing something around my 2-year-old's waist. It could be a few inches wider, but not too many, because then you'd get something way too bulky when folded up. It would also have to be at least 24" long - that would give enough overlap so that you could fold the bottom part up about 3/4 of the way or so (I'm using the Diaperbag Fold as my folding guide).

I measured the T-shirts again and figured that the XL and XXL ones were too wide to make a 2-layer flat without cutting some off, but they were too narrow to cut perfectly in half. I hesitate to cut just a portion because it would waste too much fabric, although I suppose I could make a patchwork diaper from all the cut pieces.

I settled on the one men's size medium I had and decided that would be the one to start with. It was too small to make one entire fitted diaper out of so it could be sacrificed to the cause. The shirt was almost 20" in width and about 26" in length. I could have cut off the excess inches from the width, but I did a test fold and figured I could just fold the two sides in a bit, and more fabric = more absorbency so I decided to keep it.

The next step was to remove the sleeves. I tried to fold the diaper up with the sleeves but there was just too much extra fabric and it made the diaper too bulky at the front. I was deciding exactly how to remove the sleeves when I had a thought - instead of cutting the sleeves off and zigzagging the raw edge, why don't I just keep the serged seam that's already there? I, like many people, am inherently lazy and the less I needed to use my sewing machine the better. Plus, cutting the sleeve off in this way has the added benefit of allowing anyone without a sewing machine or sewing skills to make this diaper.

I then had another thought - I was going to make a diaper that required no sewing skills whatsoever - an easy-peasy inexpensive diaper that anyone on a really tight budget could make in less than half an hour.

I took the sleeves off, cutting as close to the serged seam as possible:


There's a little bit of sleeve fabric left, but it'll just fray away in the wash.

I tried folding the diaper up as it was, sans sleeves, but it was still a bit bulky around the shoulder area. If you've ever looked inside a T-shirt you'll notice that there's a strip of fabric sewn over the seams of the shoulders and the back of the neck. This is put in a better-quality T-shirt to make it more comfortable (a bare seam can be a bit scratchy) and also to make those seams lay flat. From all my T-shirt unravelling experience I know that this strip of fabric can be easily removed to reveal the seam underneath:


The ends of the little strip of fabric was serged to the sleeves so I cut it off close to the stitching:


You don't really need to do this step but in my opinion the strip makes a little bulge in the diaper when you fold it up.

So here's the top of the shirt, sans strip:

You could also cut the collar off in the same way I cut the sleeves off (i.e. close to the serged seam) but I don't think it's necessary. I did another test fold and the collar didn't give the diaper any odd bulges so I left it in.

Like I said earlier, I'm using the Diaperbag Fold (the best flat diaper fold EVER). I folded the two sides in just a bit, then folded up the bottom. I guess it's folded about 2/3 of the way:


Fold the two sides in again, splaying out the edges:


As you can see I left the bottom hem of the shirt intact. Now fold the bottom up and the corners in and voila, a diaper!

Here's what it looks like on my 2-year-old daughter:

Not too bulky, it's nice and soft, and the Snappi holds on quite well. I slapped a bummis SWW on her and off she went. I'm also partial to wool covers so I'd use a wool soaker over this diaper as well.

So there you have it! The No-Sew T-Shirt Diaper that anyone can make. All you need is a pair of scissors and a seam ripper (which can be found at any fabric store or even WalMart). I didn't time myself but I think it took less than 30 minutes to make it, the longest bit being removing the strip of fabric at the shoulders. And the shirt cost me all of $1 - I got it during a Goodwill 50%-off sale, which they hold periodically through the year (so really it was $2).

This was a mens medium-sized shirt; like I said I chose it because it had the length I wanted, even if it was a little too wide. This could be considered a One-Size diaper, but in my opinion it would be too bulky on a newborn or small infant. I'd use a ladies small for newborns and a ladies medium for infants.

Doubler-ama!

After I made the Discouraging Diaper I thought I'd try my hand at making some doublers out of the sleeves and other T-shirt scraps I'd saved. Up until this point I'd been using preemie prefolds or a folded up piece of cotton flannel baby blanket as doublers for the T-shirt diapers, but I'd always intended on making jersey doublers so I finally sat down and did it.

It really started with these:


These are some double-layer sherpa doublers I made from some sherpa inserts I'd gotten a long time ago. I originally just cut an insert in thirds and sewed one side, but even that was too long and a bit too wide so the other day I said 'that's it!' and I made them all pretty. I used a purchased doubler/insert as a guide, cut the sherpa ones and zigzagged the edges. They're a bit curled in the photo since this is right after I sewed them. They straightened out a bit after washing.

On to the jersey doublers. I thought at first I'd make them a simple elongated oval like the sherpa ones, but anything with straight sides always gets bunched up between the legs so I settled on drafting a bone-shaped doubler instead.

I had a pattern already drafted for one of the first diapers I made, but it was for a size small, so i just made it a bit longer and copied the scoop in the middle. I surveyed the amount of fabric I had left and saw that I could get 6-full layers, and split that into two doublers of 3-layers each since 6 would be too thick to sew and I'm pretty sure it wouldn't wash out well in the laundry.

It took rather a long time to cut the forms out, and I had to substitute some tan jersey in for the yellow and blue doublers since i didn't have enough of those colours, but I managed to get 8 doublers in two days:


The topmost layer of the doublers was also stretching as I zigzagged them, so that didn't help to ease my frustration with this fabric, but they turned out all right in the end. And the jersey is more absorbent than I'd originally thought - under a PUL cover I just need the fitted with two jersey doublers. I add a sherpa doubler  if I'm putting a wool cover on my girl.

It was quite a learning experience and if I had to do it over again, I would do a few things differently. Firstly, I don't really like bone-shaped doublers. Yes the straight ones do bunch up more between the legs, but they also have more fabric and therefore (slightly) more absorbency, plus straight ones are easier to cut. Secondly, these doublers are a tad too short; I'd lengthen them by at least 2 inches. Thirdly, if I had enough fabric I'd instead make large, square/rectangular 2-layer doublers (or inserts, I guess) that you would fold into thirds - in the end it's easier to sew and gives you more fabric, thus more absorbency.

I also made some overnight doublers last night out of a few bamboo fleece wipes. Why? Mostly because I'm wacky, but really because I have too many wipes. Whenever I'm putting away the diaper laundry I have to really stuff the wipes into their container and usually I can't get the lid closed. Since I made those stretch terry wipes from the leftover baby towel material (see 'Adventures with Stretch Terry') I've got more than I need. Plus I don't really like how the bamboo wipes feel when they're wet. They're super soft while dry, but bamboo tends to get hard and stiff when it's wet (which is one reason I sold off all the bamboo diapers I had) and I don't like that.

Anyway, I figured I could make a couple of doublers for my daughter's overnight diapers and take advantage of the bamboo's super-fast absorbing quality. I took four wipes and unrolled them - oh yeah, that's another thing I don't like about these wipes, they roll up on two sides:


I bought 2 dozen of these wipes from a WAHM her in the GTA and they started off nice and flat, but after the first wash the two ends rolled up and just stayed that way. Even if I unroll them and try to flatten them out again and fold them up a different way, once they go into the wash they roll up again. Sigh.

Okay so I unrolled four wipes and zig-zagged the edges together (just touching, not overlapping) on my sewing machine and got something that looked like this:

My original idea would be to fold it up in thirds or quasi-quarters and get a multi-layer doubler like this:

This all happened at 9 pm last night, and I was all gung-ho about it but didn't really stop to think it through and I realised a few mistakes I'd made after sewing two of these.

Firstly, I shouldn't have used polyester thread. The seams were way too rough and scratchy; I should have used cotton instead. Secondly, they're much too big. My girl really doesn't need all that extra absorbency - she's already got a folded up hemp doubler in her diaper, and the diaper itself is a cotton terry flat which is pretty darned absorbent on it's own.

So just before I went to bed I ripped out two of the seams so I was left with just two wipes sewn together. Then after I was in bed for a few minutes I came upon a better way to make the doublers, but I left it for this morning since I wasn't going to get up again that night.

This morning I ripped out the last of the purple stitching, put cotton thread back in my machine and made a few doublers that look like this:

As you can see, it's just two wipes overlapping in the middle, sewn together with zigzag:


Fold the top and bottom flaps over the middle and ta-da, you've got a doubler with four layers in the 'wetzone':

We'll see how it works out tonight.

Diaper Discouraged

I made another fitted diaper last weekend (all in one day!) and while it turned out nicely:


I've become somewhat discouraged with these T-shirt diapers, only because the jersey is very stretchy and that makes it difficult to sew. Everything is fine up until the last step - serging (or in my case, zigzagging) the diaper while putting the top layer on. The top (or inside) layer of the diaper always stretches out so much while I'm sewing it on that it either makes little pleats here and there or I find I have to stop and cut off a few millimetres from the edge, and it's very frustrating. You can change the pressure on the foot on my sewing machine - if the foot presses down too much on the fabric it stretches it out while it sews - but there are only 3 settings, and the lightest stetting still presses down too much. If and when I make another diaper I'm going to try zigzagging it upside-down (with the top layer on the bottom) and see if that makes a difference, but I'm doubtful it will. 

Something else that adds to the discouragement is that not all jersey is Snappi-friendly. If the weave is too tight the Snappi doesn't bite well and tends to pop off. I don't like using pins because I'm not good at using pins, and I also don't like poking holes in this rather thin fabric all the time. I have used pins on these t-shirt diapers on occasion and if I can get them in the right position they work pretty well, but I'm afraid that they'll just end up destroying the diaper.

Finally, my problem is that I'm more inclined to use prefolds and flat diapers on my daughter, so no matter what fitteds I use (Crunchy-Viking-made or otherwise) they're somewhat sub-standard in my opinion.

So what's next? Making flat diapers from T-shirts, of course!

Tuesday, July 26, 2011

A Pattern Emerges...

Four diapers (and patterns) later and I've finally settled on a pattern. It's been Frankensteined from two free online patterns and something I drafted myself. The Decepticon Diaper was okay for fit but because of the sharp corners it had under the wings it was hell to serge, so I rounded the corners a bit for the next one.


You can't see it too well in this photo, but the diaper is a lovely, bright lime green. Colour-wise this is my favourite of the ones I've made so far.

I also rounded out the front of the diaper, again because corners are murder on a serger.


I had a bit of a screwy patch in the serging that I had to fix by hand, but it's holding nicely.


The 'scoop' of the wings wasn't rounded enough and I still had trouble serging it so for the next diaper I made that part even more rounded. But because it made the back so much wider I had to lengthen the wings. This one was almost perfect.


I love the purple serging on every diaper; I think that if I do end up selling diapers I'm gonna make the purple thread my trademark.

Oh, and I also used new elastic on this one - 10mm cotton braided elastic and OMG I don't know if it's the cotton or just the brand but this elastic is SO MUCH BETTER. It's super stretchy and stays super stretchy even when sewn onto the body of the diaper. It's so stretchy in fact that it makes the diaper look smaller than the previous two (Hubby even thought I'd made a smaller-size diaper) and as a consequence it fits my daughter so much better. Since the elastic is stretchier, there's less of it in the diaper and it makes a tighter fit. I'm switching elastic for good.

Anyway, I still wasn't satisfied with the curve of the wings so I scoured the internet for another free pattern - a one-size fitted - and then I realised I already had one downloaded. Doh. I printed it out and compared it to the one I'd made and they were almost the same, except that the one-size pattern's wings were longer and the area under the wings was even more curved. I played with the idea of trying out the one-size pattern (shortened in the body so that it would fit my daughter) but I decided instead to take the back of that pattern and paste it onto the rest of my pattern (with shorter wings). There was surprisingly little alteration needed (I only cut off a couple of milimetres to make it connect to the rest of the pattern) and tested it out with a tan coloured shirt.


It turned out really nicely, but this was the most frustrating diaper out of all of them because my darn serger decided to become entirely useless on this one. It'd been working fine up until then and suddenly decided to intermittently drop stitches.

In a way this was a good thing (even though I had to rip out the stitching on the diaper twice; luckily I noticed the dropped stitches before I'd even done half the diaper so it wasn't much either time) because it made me finally figure out how to do some kind of overlock or whatever with my mom's old machine. The machine has a real overlock, as I've mentioned in previous posts, but it uses a heck of a lot of thread (mostly from the little bobbin which is a bitch to rethread) so I tried out the 'zig-zag overedge' stitch. It has a special foot to allow you to sew over the edge of the fabric (as the name implies). I used it while making the purple wool wrap and figured it would be good enough.


Looks rather nice, though I think I may have to add a straight stitch along the bottom of the zig-zag to make it more secure. It's gone through two washes and so far so good. Using one machine does make the whole process a lot easier because I don't have to keep switching machines (and lugging the heaviest one, the serger, up and down the stairs all the time). And it's MUCH easier to use the zigzag on the edge than to serge. I have way more control and it's easier to stop and go over mistakes, but since it doesn't cut the fabric before sewing it I just have to make sure everything's even before sewing. No biggie; a few snips and it's ready. Plus I can pin everything mores securely so that the fabric doesn't end up stretching as much.

Speaking of the purple wool wrap, I've since moved the velcro and lanolized it, but after trying it out on my daughter I noticed that it wasn't felted enough because it was still really stretchy. I ran it through another felting wash and it's better (and fits a bit better, too) but I think it still needs one or two more washes to be really and truly felted. What I may do is put it in boiling water for a few minutes, then dunk it in cold water (just to speed up the process) but I'm still undecided. I use it as a spare cover, but I don't really like it because it gapes open at the front.

These two pictures were taken before I did another felting wash. The fit's not bad, but it's kinda big, and like I said it gapes at the front because the wool stretches too much.


After another felting wash:


It's hard to tell but it does fit smaller and there's less stretch in the wings, but again, it needs more felting. 

That's all for now. More diapers on the horizon...